Tuesday, October 6, 2015

Moon Photography!

Moon, mid-eclipse. 200mm lens, ISO 400, f4, 1s shutter speed


Sorry, this is a little late to capture the lunar eclipse, but taking pictures of the full moon can still be fun even when its not being eclipsed.

Before I get started talking about exposure and lenses and such I wanted to explain someone that may not be obvious and understanding this will help you better understand how to take pictures of the moon.  The moon, which you may know is being illuminated by direct light from the sun.  And, the moon is essentially the same color as concrete.  Basically, this means the moon is as bright as a sidewalk on sunny day.  So don't be surprised that you may find that a proper exposure is going to be somewhere in the ballpark of ISO 400, f/16, at 1/250th.

Fun fact - the human eye/brain completely exaggerates the size of the moon and it is always disappointingly small in photos so you will want to use as long a lens as you can.  200-300mm for instance would be much more preferred.

You can shoot a time-lapse of the moon but it moved quite a bit in 30 seconds.  Below you can see two images taken 30 seconds apart and see how much the moon has moved in that interval.


So you can shoot a time-lapse but the moon will move across the frame unless you use some sort of star tracking tripod - which I don't have... yet.  It seems like I do more and more astrophotorgaphy so I may pony up a few hundred dollars to be able to do this.

Below is my off the cuff time lapse that I shot.  Since the moon moves so much I had to adjust the camera every 30 minutes or so.  Also, I had to adjust the exposure not only because of the eclipse but also because of cloud cover.  That is why at times the moon seems to disappear is because I stepped away from the camera and clouds rolled in and obscured the moon.  Also speed at which the moon moves is due to a change in interval timing.  At first I was taking pics every 30 seconds, but toward the end I switched to 15 second intervals.

Enjoy!


Friday, July 10, 2015

Do You Need 50+ Megapixels?

How Many Megapixels Do You Need? 

Just a cell phone photo I use in an example later to calculate megapixels.
 
For those who may be unaware, digital camera manufacturers have been engaged in an all-out megapixel war.  The opening salvos of this battle had probably began back in the 90’s with the first consumer digital cameras, and at one point they marketed the number of megapixels down to two digits. An example would be my ancient Nikon Coolpix 900 with 3.34MP – wow those last .04 MP were really important! Nikon’s last generation of cameras upped the ante with 36MP D800 which eclipsed Canon’s 5D Mark III with a measly 22.3MP.  Canon answered in their latest line up with the 5Ds and 5Ds-R monsters which feature a 50.3MP sensor (not sure why we need these decimal points any more).  The “-R” signifies that the low pass filter was removed to improve fine detail sharpness. So of course now everyone is speculating when Nikon will release their next assault.  Sony, who makes most if not all of Nikon’s sensors, has a 44MP camera locked and loaded in the chamber ready to be unleashed on the world, which means the next Nikon body will likely have at least that.

Megapixel is a marketing companies dream because it’s this number that seems to equal the “goodness” level of a camera. If a 8MP camera is good a 10 is better. At first this was kind of true but are we now getting to the point of diminishing returns?  A long time ago, I read some photography magazine (it’s like a blog but it was printed and you had to buy them at stores) article, and they wanted to find out how many megapixels you needed to equal 100 ISO film.  I am giving only a brief overview because various films had different properties and so did different speeds – but basically they concluded that 35mm 100 ISO film was about the same as 10MP.  So what are megapixels and how many do you need?

If we want to know what a megapixel is we need to define what a pixel is – its the smallest spec of color in a digital image. Mega, that means million, so a megapixel means a million pixels.  Hence, a 14 megapixel camera captures images that have 14 million pixels.  Its actually pretty easy to figure out how many pixels or mega pixels an image is.  I got the new Samsung S6 phone and I don’t know how many megapixels the camera is.  Now I could be boring and look it up with google or something but I can just as easily figure it out on my own.  I have a photo  that I transferred to my computer.  In Windows you can select the file and it will tell you its size (see screenshot below). Its 5312 pixels x 2988 pixels. Multiply the two number together, divide by 1,000,000 and you get 15.872256 megapixels – but you can round to 15.9 I suppose.  


Circled you can see the dimensions of the image that are used to calculate megapixels.


Now that we have that sorted out does more mean better?  Not really. More means more.  For example, I guess megapixels is kind of like horsepower.  You don’t gage the “goodness” of a car solely on how many ponies are harnessed under the hood and usually higher hp translates to lower fuel economy.  So a 700 hp car would be fun but its not for everyone – many people are quite content with 11-150hp and the better gas mileage.  That’s kind of the same with megapixels – there is a threshold at which point you really don’t need more.  That threshold is different for different people depending on what they do with their photos and there is a down side to getting these giant photos which I will talk about shortly.

If you make prints, especially large prints you are going to need more megapixels than someone who just saves photos on their computer or shares them online.  But you might be surprised how many you actually need. To make a good 8x10, 3MP.  Without cropping, I have printed an 11x14 from a 3.3MP image and it turned out great but I would want to shoot at 6MP just in case I need to crop a little.  The next standard size is 16x20 and since the surface area of that print is about twice that of an 11x14, its nice to have twice as many MP – so I would say 12.  Not many people are making prints this large and I have printed as large as 24x36 with a 12MP image with great results so I think most people really only need 6MP but its nice to have up to 12.  Unless you are always cropping your down pretty significantly or printing banners, anything more than 12MP is unnecessary. 

If you often find yourself shooting at 3200 or more ISO then the extra MP helps hide all the digital noise so I don’t want to forge to mention that.

Now there are a number of reasons why high MP cameras are actually kind of sucky.  The file sizes are huge which means your memory cards don’t go as far as they used to, hard drives fill up faster and general computing power needs to be bumped up to maintain the same post processing time. If you backup your files to the cloud then your upload times will also increase. 

Though I am sure there are a lot of people who will love 50+MP cameras, for most people its more than they will ever use or need.  For the most part I would be content with 12-16, but I don’t see a truce coming anytime soon in this war. 

Tuesday, April 28, 2015

What Are Color Profiles and Why Do You Want Them?

Or - How to Make My Photos Look Like Whats On My Computer Screen


Have you ever wondered why the photos you get printed never seem to look like what’s on your computer screen?  In some cases you might have spent hours meticulously editing the photos to look just right and then you get them printed and they look horrible.  Well there is a fix for that and it’s really not that hard!

Colors, in the digital world are represented by a number.   Computer monitors, scanners, and printers all use some number to represent a color and basically what happens is that they all see the colors slightly differently.  So what is a navy blue on your screen might be interpreted as a dark blue - almost black - to your printer.  Now your next question is "how do I fix this?"  Well the answer can be really simple or it can be pretty complicated.  There are these .icc files that are called "color profiles" that are specific to each printer/paper combination and basically what they do is act as a translator and make corrections to the files when you print so that what you see on your screen is what gets printed. 

Now why I say this can be simple or complex depends on if you want to invest in some hardware and what printer or print house you want to use.  The first step is to calibrate your monitor.  There are some devices out there that will do this for you automatically and can be pretty reasonably priced.  The Pantone Huey Pro is one that I have used and I have had great luck with it.  You can get it from Amazon HERE and it will run you about $75.  There are also more professional ones that can run a few hundred dollars but I will leave the research up to you.

The next step is to find the color profiles for the printer that you are going to use.  If you are printing at home your best bet is to go to the printer manufacturer such as Epson, Canon or HP.  However, their profiles are typically only good when using their paper (not surprisingly), but Canon has shocked me and offered a number of profiles for third party papers.  See links to their websites below.  Red River is a third party paper manufacturer and has some profiles HERE.  If you are dead set on using some unique paper/printer combination you may have to make your own profile but that is a bit more involved and beyond the scope of this post.

EPSON
CANON (they also provide color profiles in their software, but also have them for 3rd party papers with Canon printers)

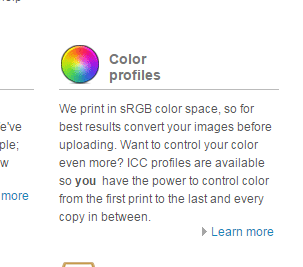
A lot of people, myself included, don't make a lot of prnts so they don't own a fancy printer and would rather get them printed at a print-house.  In this case you can see if they have their color profiles available online.  I often use Adoramapix because they do make their .icc files easily available online HERE.  Costco is also known for having color profiles for most if not all their stores.  Go HERE and use the index on the left to select your state and you can find a number of different places that have their icc files available for download.

For Adorama, when you go to their site click here on the color profiles section shown below:


Then you will see this and select the types of papers you will be using. I typically use glossy, but I also downloaded the matte one just in case.


From here on out I am going to be focusing on Lightroom since its what I know.  Photoshop will be somewhat similar.  If you are using a different photo editing software you can probably go into the help section and type "color management" or "color profiles" to get you on the right path.
 
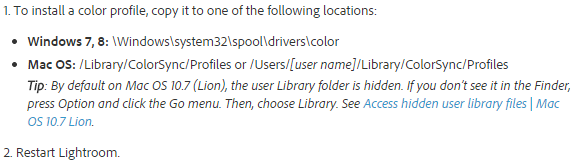
Now to load the profiles into Lightroom you have to copy the files to a specific location.  You can visit the Lightroom help HERE but I took a screenshot the directions that you can see below. 


Here the directions diverge depending if you are printing at your house or getting them printed somewhere else.

Print at a Store

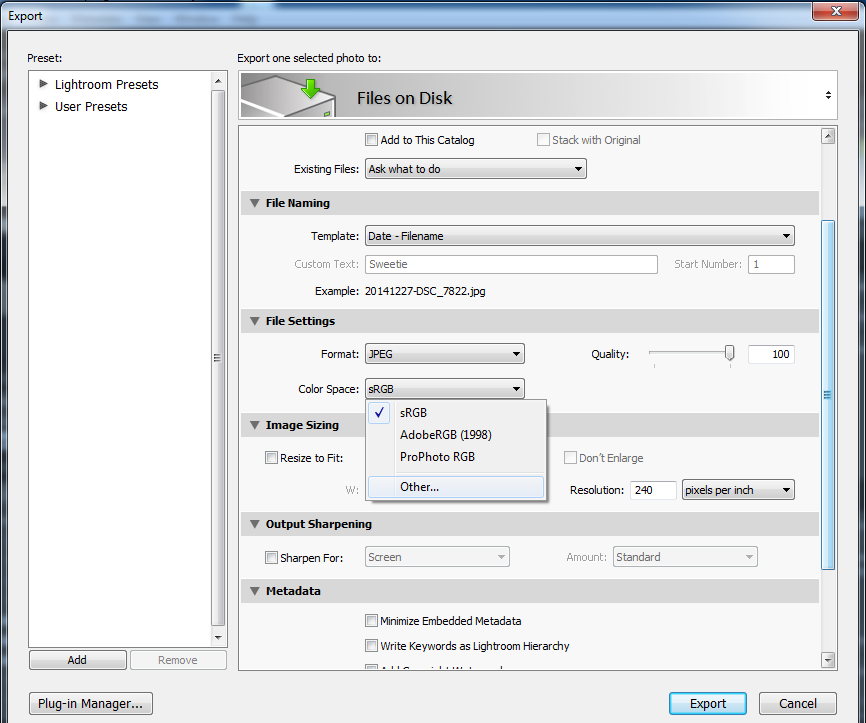
After you are done editing the files you will need to export them and when doing so embed the color profiles directly into the file. In Lightroom you export as you normally would except under FILE SETTINGS, COLOR SPACE, you drop down and select OTHER.  See below. 


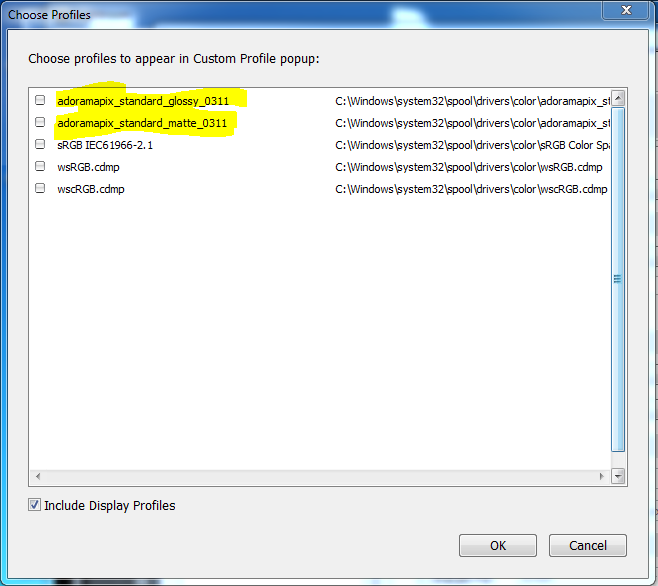
The screen below will pop up.  I highlighted the Adoramapix color profiles just so they stand out.  Select the one appropriate for the paper finish you want to use and hit OK. 


Now when you go back to your Export Screen you will see this below - highlighted yellow. 


Just a side note - when I export files that have a specific color profile imbedded into them, I usually put them in their own special folder like "Photos - Adorama" or some such so that know not to use these somewhere else because they may not print right.  Next is to then upload them to Adoramapix or Costco or put them on a thumb drive and take them to the print shop. 

One last important step - if you upload the prints there is a step or setting that you have to make sure you find.  On the Adoramapix site it looks like this:

Make sure you check the "NO. Thanks, Don't Touch My Images."  This tells them you already corrected the prints.  Costco has a similar setting but since I don't have a Costco membership I can't show you that.  But you should be able to figure it out.

Assuming you have a calibrated monitor your prints will be pretty much spot on. Even if you monitor isn't calibrated it probably gets you a bit closer than you were.


Now if you are using your own printer the process is a little different.  Again, this is for Lightroom - go to the Print tab and in the menu on the right scroll down to the bottom.  You will see the image below (minus the red circles :-)) In the color management, profile, select the printer profile that you need to use.  Highlighted in yellow and circled in red there is a warning that you need to turn off the color management in the printer settings too - otherwise this will all be for not.  I can't help you with the printer settings since they can vary but buried in there is something that tells the printer not to mess with your files.


Anyways - hope this helps and if you have any questions please post them in the comment section below.  I would also appreciate it if you followed me on this blog.

Monday, April 6, 2015

Shooting the Milky Way with the D3300


This is a quick post for one of my viewers who is requesting my exif data from the shots in my video Review - Nikon D3300 which featured some Milky Way time lapse shots.  

The shots in questions are these here:

Nikon D3300 with Pro-Optic (aka Rokinon, Bower) 8mm f3.5 Lens
Nikon D3300 with Nikon 14-24 f2.8 Lens

Here is the Exif data for the images - at least the important data:
For the first image

For the second image
I will expand on this blog in the next few days but I wanted to answer the viewers questions quickly.

Thank you!

Thursday, February 26, 2015

Organizing Your Photos -

Strategies and Tips

Organizing photos has always been a problem even in the age of film though the volume of photos people can generate has magnified significantly with digital.  There are a number of strategies for organizing photos and I will go into some detail what I do and perhaps you can take use this my process or develop your own to help you keep your images sorted.  The key is to figure out your system and then make sure to follow it as you unload photos from your camera onto your computer because once you get behind it can be hard to find the time and/or the motivation to clean up the files.  Then you run the risk of losing photos you treasure either because you accidentally delete them thinking they are stored somewhere else or your computer dies and you don’t get them backed up properly.

Really the only way to organize digital images is to figure out some sort of file structure that you can place your photos into.  It seems that people typically decide to organize by date (ie 2-15-2015), or event name (ie “Christmas at Grandma’s”).  Now there are advantages and disadvantages to both. For instance, you may not remember what date something happened on so you will find yourself spending a decent amount of time searching through folders trying to find the photos you are looking for.  Also, if you don’t use the right date format you will find that your folders won’t be in the order you expect.  For instance, if you use the format 1-7-2015, then all your January dates will be grouped together, then February, etc.  On the other hand, if you list it by event name and you don’t remember what you called the event – for instance you remember is was at Grandma’s house, but you forgot you called it “Christmas at Grandma’s” you will have to read each folder name until you find it.  What I have found that works the best is a combination of the two. 


Here is an example of how I organize my photos.

My top level folder I call “Photography”.  Under that I have a folder for different years 2007, 2008, 2009… etc.  Within each
year I have folders for events “Renaissance Fair”, “4th of July”, and the like.  Since I started I have gotten into Milky Way time lapse which has become quote a large portfolio.  Each shoot yields hundreds of photos and since I didn't want to have to dig through my general photography images to find these I created a new broad category labelled “Time Lapse.”  In this folder I use a slightly different strategy to organize my files since I seem to shoot in the same locations regularly and the date is irrelevant to me, under the main folder I have a folder for different locations.  Those folders are then sub divided into more folders with descriptive names like “Silos with clouds” – which means something to me but probably not anyone else.  I have also created large broad categories to organize photos of local bands I shoot, Infrared photography and one folder dedicated to my daughter.  


This shows how Lightroom is organized .
As you broaden your photography interests you might make other broad categories  as well – such as Weddings or Real Estate or what have you. This works well not only for general file organization, but also works well in Lightroom.  Now each broad category can become its own Lightroom catalog.  The only issue I have had is if you want to transfer images from one catalog to another it can be a little cumbersome – but perhaps this was solved since v2.7( yeah I am a little behind the times…)

Maybe you are just taking pictures of your family and some landscapes or whatnot you could still separate the images into broad categories such as “Kids” or “Dogs.”  My mother-in-law takes pictures of trees.  She could have one folder labelled “Trees”, a folder for “Family” and then “General.”  Really, you can adapt this to you own personal needs.

One note that I would like to stress, if you do choose to label folders by date, is not to use the standard American date format (ie month-day-year).  The folders, which are usually sorted by name, will have all the months grouped together and your folders will be out of chronological sequence.  So, for example, all your January folders will be together, then all your February and so on and so on.  See example below.  The 1/1/2001 then the 1/1/2002 are next to each other.  

Naming Files with month first will group months together as opposed to grouping years together.
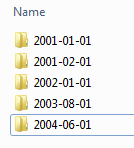
My suggestion is to label them year first, then month and day - always using 4 digits for year, 2 digits for month and 2 digits for day.  See below. This standardizes the titles of the folders and makes it easier to find a particular date. 

Name them with year first and they will be in chronological order. 


Backing Up Files:
On a side note, once you have a pretty well established file system, backing up files becomes that much easier.  I am not going to get into to much detail here since this is a whole other topic in itself but I mention it now since you should develop a backup routine because no hard drive or computer is going to last forever.  There are a couple different things you can do now to help protect your files.  One is to back them up onto an external drive on a regular basis.  They have become much more affordable and you can find a 1TB external hard drive for about $60 online.  Another option is to use a "Cloud" backup.  Meaning you upload your images/files to some online service.  This is a great option since internet servers (where your files will be stored ) have a very regimented and robust backup process and its highly unlikely that the data will be lost.  There are a couple disadvantages to this however, one being there is likely a monthly/yearly cost if you want to store more than 5GB of data, and secondly, uploading a lot of large files may take a long time or be impractical if you don't have access to high speed internet.  


Saturday, January 18, 2014

Arduino Time-Lapse Dolly Project Part 3

Arduino Time-Lapse Dolly Project Part 3

Stepper Into Motion

Now that I have tried the relay hooked up to the camera, got a button to fire it, and now its time to test the stepper motor.

First I should briefly explain what a stepper motor is and why I choose to use one.  They are called stepper motors because they move in small incremental steps which is generally measured in degrees.  So a 1.8 degree motor will take 400 little steps per revolution.  Because the motor can move in these small increments, it can (depending on the quality of the motor) make some very precise movements.  That is why I chose such motor for my application since I need the camera to move in consistent, accurate movements between shots.

I am using the Adafruit motor shield.  After I bought it, and started to figure out more about these crazy motor shields they can only handle so much power which means the motors can't draw to much power itself.  The Adafruit ones can handle 1.2A and I found it difficult to find a motor that was less than that. I eventually got one that draws .4A but I am not sure it will be powerful enough to move the camera... we will see!  Regardless it was only $15 so it if doesn't work I can at least use it to test everything out.

The Adafruit website is actually pretty handy and they have a lot of tutorials which is super awesome (see this link here) - though the one for this motor shield was slightly wrong at points, it was right enough that you can figure it out.  First thing first was to download the motor shield library. For instance, the tutorial said once the library is installed it should be accessible through the File/Examples/AFMotor, but that never happened for me.  It does show up under Sketch/Import Library/AFMotor and when you select it you get a "#include " added to the code - I assume always to the top but I haven't done it when there was code present.  Don't let this bother you, keep following the Adafruit tutorial and it has a lot of useful information and some example programming.  I used that example to help with my code below.  

Next step was wiring the sucker up.  For a test, and test only, I used a 9v battery to power the motor.  In real life the battery probably doesn't have enough juice to fully power the stepper motor I am using nor will it have the longevity that I need - 600+ cycles.  I bought a 9v battery hookup and wired it to the board at the Ext. PWR block.  Next to that, there is a jumper. Per the Adafruit tutorial if you want to use an external power supply to run the motor that is separate from the Arduino board, then you remove the jumper.  If you Arduino power supply (ie USB cable) is going to power both then leave the jumper in place.  As a side note, my experience is that even with the jumper removed, when I plugged the Arduino in to the USB to update the program it moved the motor.

Blur block next to the EXT PWR is where you can hook up the power.  The red circle on the right is where the jumper is located.  In this photo, I have already removed the jumper. 

I got a Primopal motor because it was cheap (~$15 shipped), and it was nice that Primopal had data sheets available for all their motors.  Without some sort of tech sheet you will have to figure out how to wire the motor to the board.  Now I am not expert on stepper motors but some are uni-polar and some are bi-polar.  Uni-polar motors have 5 wires and bi-polar have 4.  Either one will work, the shield allowed for both to be hooked up.  There are online resources that will show you how to wire the motor if it doesn't have a data sheet.

To test the motor I used Adafruit's tutorial code with some simple changes.  The motor I have is 1.8 degrees per step, and Adafruit is using a 7.5 degrees per step.  So I changed the steps from 100 to 400 (see red text below).  I also changed the rpm from 10 to 60 just because.

#include


AF_Stepper motor(48, 2);


void setup() {
  Serial.begin(9600);           // set up Serial library at 9600 bps
  Serial.println("Stepper test!");

  motor.setSpeed(10);  // 10 rpm

  motor.step(100, FORWARD, SINGLE);
  motor.release();
  delay(1000);
}

void loop() {
  motor.step(400, FORWARD, SINGLE);
  motor.step(400, BACKWARD, SINGLE);

  motor.step(400, FORWARD, DOUBLE);
  motor.step(400, BACKWARD, DOUBLE);

  motor.step(400, FORWARD, INTERLEAVE);
  motor.step(400, BACKWARD, INTERLEAVE);

  motor.step(400, FORWARD, MICROSTEP);
  motor.step(400, BACKWARD, MICROSTEP);
}


Now - to tie my camera shutter, and stepper motor together I wrote this code.  A button sets the whole thing in motion.  It will take 20 photos and advance the camera on the track 20 times (see the yellow highlighted section of the code in which this number is set). Keep in mind I have a MEGA board and not the regular Uno board, so I have more pins.  The button and relay are hooked to ports 52 and 53.


#include

AF_Stepper motor(200, 2);  //number of steps per revolution and indicates which port the motor is wired to.

const int buttonpin = 53;  //number of the pin the button is connected too
const int camerapin = 52; //number of the pin the relay to trigger the camera is connected too

int buttonstate = 0;

void setup() {

 pinMode(camerapin, OUTPUT);
 pinMode(buttonpin, INPUT);

 // Setting up the stepper motor
 Serial.begin(9600);           // set up Serial library at 9600 bps
  Serial.println("Stepper test!");  //probably not a necessary line....

  motor.setSpeed(60);  // 60 rpm
 }

void loop(){
  buttonstate = digitalRead(buttonpin);

  if (buttonstate == HIGH){
 
    for (int i=0; i<20 span="">; i++) //this will be the stepper motor camera trigger loop, i dictates the number of times the camera shoots
  {
    digitalWrite(camerapin, HIGH);
    delay(3000);
    digitalWrite(camerapin, LOW);
    delay(500);
    motor.step(400, FORWARD, SINGLE);
    delay(1000);
  } //ends the FOR statement
 }  //end IF statement
} //ends LOOP


Next Steps - make a track and dolly for the camera!

Saturday, January 4, 2014

Arduino Time-Lapse Dolly Project Part 2

Arduino Time-Lapse Dolly Project Part 2

Buttons make it go!


For those who have not had much experience with the Arduino, basically what happens is once the board if plugged into a power source the program starts to run - so in this case the relay will start clicking away until you unplug it or upload another program.  So its kind of nice to update the program so that the relay, and therefore the camera will only fire once a button is pressed.

Now I add a button that will trigger the relay and therefore the camera.  The basic button wiring can be found on the Arduino site but I have one here as well:


So I ran a wire from the Arduino +5v pin to the bread board.  Hooked one side to the switch, on the other side of the switch is connected to a digital pin on the Arduino (Pin X), plus a 10K Ohm resistor connected in parallel to ground.

Here is my set up:

Button is the little back square on the white bread board.  The purple wires connect to the relay.  The red, yellow and black wires on the left side go to the camera.  

One thing to consider is that buttons aren't perfect and may "bounce" - meaning they don't make smooth contact and may chatter a bit.  I added a simple debounce code - very simple, maybe even laughably so - but I am a simple guy and I didn't understand the debounce code available online.

Here is my code:

const int buttonpin = 53;  //number of the pin the button is connected too
const int camerapin = 52; //number of the pin the relay to trigger the camera is connected too

int buttonstate = 0;

void setup() {

 pinMode(camerapin, OUTPUT);  //sets pin 52 to output mode
 pinMode(buttonpin, INPUT);  //sets pin 52 to input mode
}

void loop(){
  buttonstate = digitalRead(buttonpin);

  if (buttonstate == HIGH){
    digitalWrite(camerapin, HIGH);  // since I am not sure how much time the relay needs to be on for the camera to register it will keep the relay "on" for .1 seconds. 
    delay(100);
    digitalWrite(camerapin, LOW);
    delay(500); //to help prevent the button from triggering the relay multiple times by accident, this delay prevents the button from being pushed again for .5s
  }
  else{
    digitalWrite(camerapin, LOW);  //in hindsight, I probably don't need an "ELSE" statement
  }
}


Next: Stepper it up!